How to set up and create an Ethereum wallet
Find out how to set up CEX, DEX and hardware Ethereum wallets that are essential for efficiently traversing the cryptocurrency ecosystem.

For anyone looking to participate in the Ethereum ecosystem, creating an Ethereum-based wallet is often the first step. With a wallet, users can trade or hold Ether (ETH) and interact with decentralized applications (DApps) and smart contracts built on the Ethereum platform. Thus, the wallet facilitates financial and interactive experiences for the user within the Ethereum ecosystem.
This guide explains how to set up and create an ETH wallet on a centralized exchange (CEX) and a decentralized exchange (DEX) and how to set up a hardware wallet.
Setting up a centralized exchange (CEX) ETH wallet
As the name suggests, CEX wallets are a product of centralized exchanges (CEXs) that allow users to hold and trade cryptocurrencies. Easily accessible and user-friendly, CEX wallets enable users to trade ETH and other cryptocurrencies using a safe interface, thanks to the integrated support for a wide range of blockchain networks.
Though CEXs offer convenience, it comes with the need to trust your funds with the exchange. Therefore, it is crucial to choose a reputable exchange with a strong track record of keeping users’ crypto assets safe.
Let’s understand how to create a wallet on Binance with illustrations.
A step-by-step guide to creating an ETH wallet on Binance
One can create an ETH wallet on the Binance website or its smartphone wallet by following the steps below:
Step 1: The user can sign up on Binance via their Google or Apple accounts. They can also choose to sign up with their phone number and email address.

Step 2: The user must agree to the Terms of Service and Privacy Policy by ticking the white box, after which they can click “Confirm” to create an account on Binance.

Step 3: Once signed up, the user is taken to their wallet dashboard, where they can engage in a range of functions such as trade, swap, peer-to-peer (P2P) transfer, buy cryptocurrencies and many more.

Step 4: Users can deposit ETH into their wallet by clicking on “Deposit”; however, the user will need to complete the Know Your Customer (KYC) requirements.

Step 5: Once the user meets the KYC requirements, they can deposit ETH into their wallet by selecting “ETH” from the menu.
When using a CEX wallet like Binance, users should enable two-factor authentication (2FA) to add an extra security layer to their ETH holdings. For additional security, they can set up a dedicated email for all their crypto transactions.
Setting up a decentralized ETH wallet
Decentralized wallets place complete control of crypto in the hands of users. There is no centralized system to keep custody of users’ login credentials. Users set up a recovery phrase when setting up their account for a decentralized wallet.
In the event that the recovery phase is lost, the funds stored in the wallet are lost forever. Since users don’t need to trust a particular third-party entity to keep their login credentials, decentralized wallets are termed trustless systems.
Let’s understand how to set up a decentralized ETH wallet, using the Coinbase wallet.
A step-by-step guide to installing a Coinbase DEX wallet
Coinbase operates one of the largest centralized exchanges. The Coinbase Wallet is a separate product that offers a decentralized wallet solution, giving users more control and responsibility over their funds and interactions with blockchain networks.
Step 1: Users need to visit the Coinbase website on their smartphone and click “Sign Up.” On a desktop, it can be installed as a browser extension.

Step 2: Select the account type and click “Get Started.”

Step 3: Users can now download the Coinbase wallet.

Step 4: The Google Chrome browser extension will assist users in understanding how this works. This will take users to the Chrome web store, where they can download the wallet by clicking “Add extension” in the pop-up.

Setting up the Coinbase Wallet
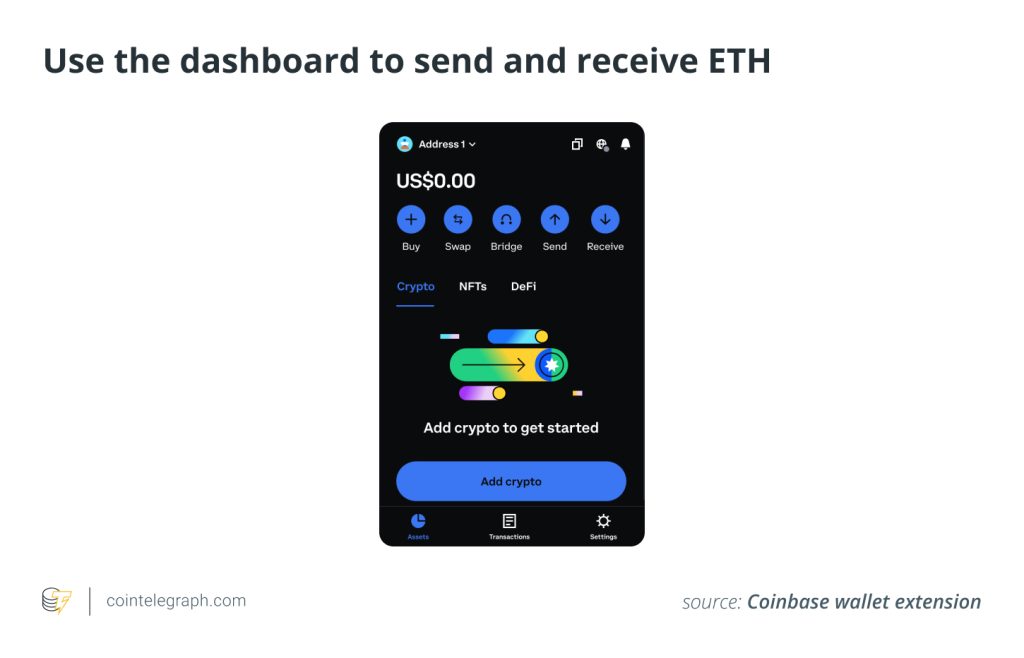
Step 1: Users start by clicking on the Coinbase Wallet extension and clicking “Create New Wallet.”

Step 2: During the setup process, users will be asked to store a series of 12 words somewhere secure. They need to keep these words safe, as they are essential for restoring access to the wallet should they ever forget the password.

Step 3: Now, users need to create a strong password for their wallet, agree to the terms, and click “Submit.”

Step 4: Users are now all set to receive, store and send ETH.

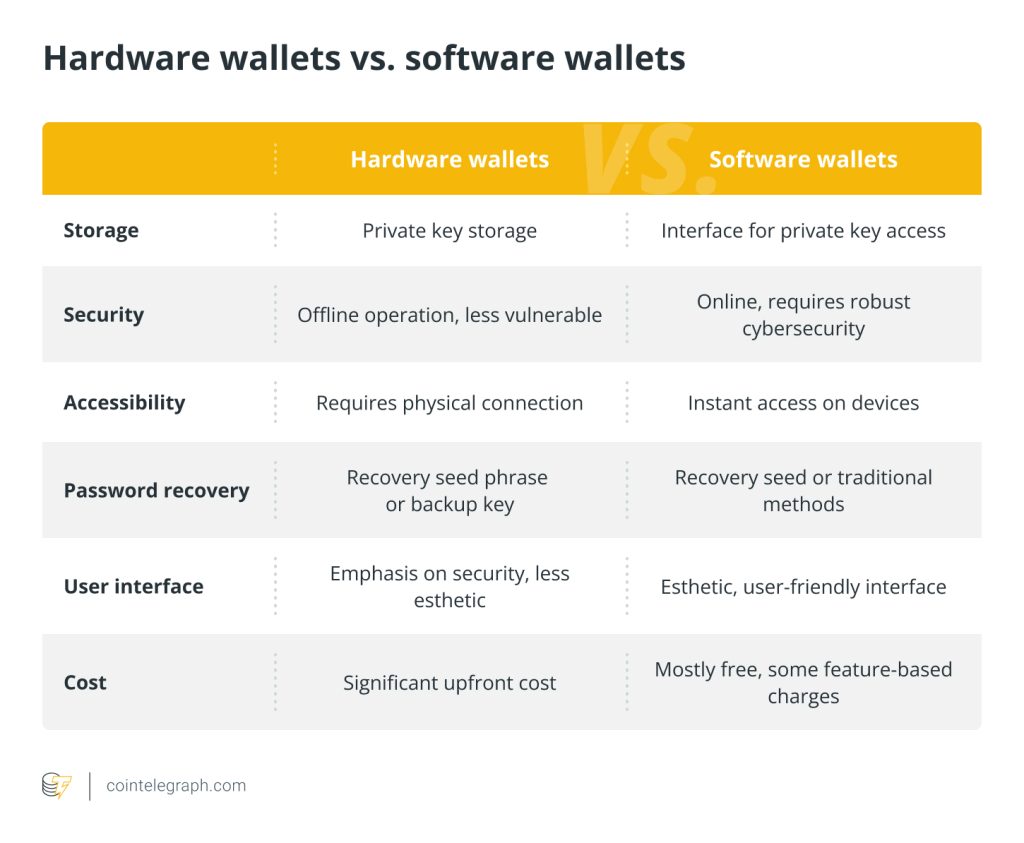
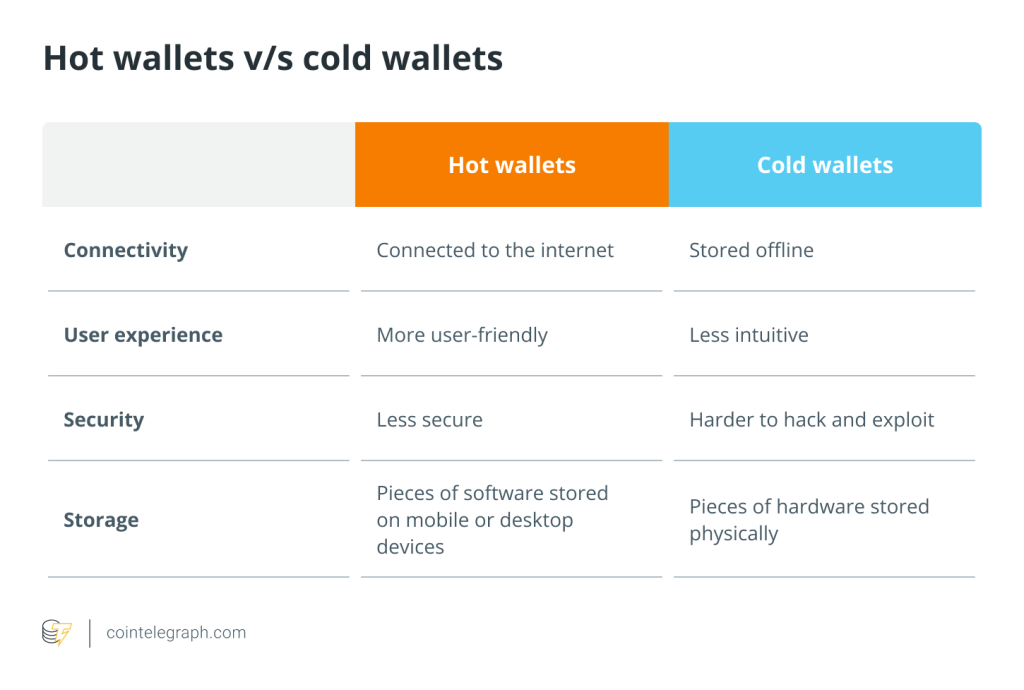
Though decentralized networks provide better security compared to centralized networks by enabling users to hold their private keys, leakage of funds might occur if proper auditing hasn’t been done. Cybercriminals are always on the prowl to take advantage of software vulnerabilities.
Setting up a hardware wallet for ETH
Considered the securest of the lot, hardware wallets store digital assets, including ETH, offline, thus taking them outside the reach of hackers.
Here is a step-by-step guide for creating a hardware wallet for ETH. However, do take into account that there are several hardware wallets and that the process might vary across these devices.
Step 1: Initialize the wallet
Users must power on the device and begin the initializing process, which involves setting up a PIN and writing down the recovery phrase, which acts as a backup if the wallet is lost or damaged.
Step 2: Update the firmware
Users now need to connect the device to an internet-enabled computer, navigate to the manufacturer’s website, and update the firmware.
Step 3: Set up a wallet interface
Users need to install the necessary software on their computer or smartphone to enable interaction with the hardware wallet. Ledger wallets usually use Ledger Live, while for Trezor devices, one needs to use the Trezor Suite.
Step 4: Create an Ethereum account
Users will have to create an Ethereum account within the wallet interface. Users will be using this account to send, receive and manage ETH. For easy identification, giving it a recognizable name is an ideal choice for most users.
While hardware wallets are known for providing the highest level of security among wallets, users need to be mindful of a few points. They need to get their wallets from reputable vendors, keep their wallets updated, retain the secrecy of their seed or recovery phrase, use a strong PIN, avoid public WiFi networks, and regularly audit wallet activity.
Navigating the path to Ethereum’s ecosystem
Anyone consistently active in the Web3 space will usually require a CEX, DEX and hardware wallet. All three options stand out for convenience, control and security. A set of Ethereum wallets serves as a tool for handling ETH and gives users a foothold in decentralized finance.
Recognizing risks such as market volatility and security flaws in both centralized and decentralized exchanges is necessary when navigating the Ethereum ecosystem. CEXs are convenient, but hackers can easily compromise them.
Despite their autonomy, DEXs are susceptible to smart contract vulnerabilities. The price volatility of ETH raises the risks even further. A balanced strategy combines centralized and decentralized services for improved security and accessibility, diversified portfolios and risk management. With a balanced approach and an understanding of these challenges, users may confidently navigate the Ethereum ecosystem.

Responses